Connect a Domain in 10 Minutes
💡 In this guide, you will copy the AllinCMS admin
CNAME target, add both@andwwwCNAME records at your DNS provider, then checkDNSandSSLin AllinCMS admin. Estimated time: 10 minutes.
If this is your first time connecting a domain, do not start by learning every DNS term. First follow this main path:
Copy CNAME target -> Add @ and www CNAME records -> Add both domains in AllinCMS admin -> Wait for DNS/SSL -> Test access
Overview
| Stage | What you finish | Key point |
|---|---|---|
| 1. Get target | Copy the CNAME target from AllinCMS admin | Copy the plain domain only |
| 2. Add DNS | Add @ and www CNAME records | Use the same value; do not use A |
| 3. Refresh | Add the root and www domains | Check DNS and SSL for both |
| 4. Test | Open the domain in your browser | Use https:// |
📺 Video: DNS Setup
📺 Video blank? Open it in a new tab.
1. Get Target
You do not need to guess where the domain should point. AllinCMS admin gives you the target value.
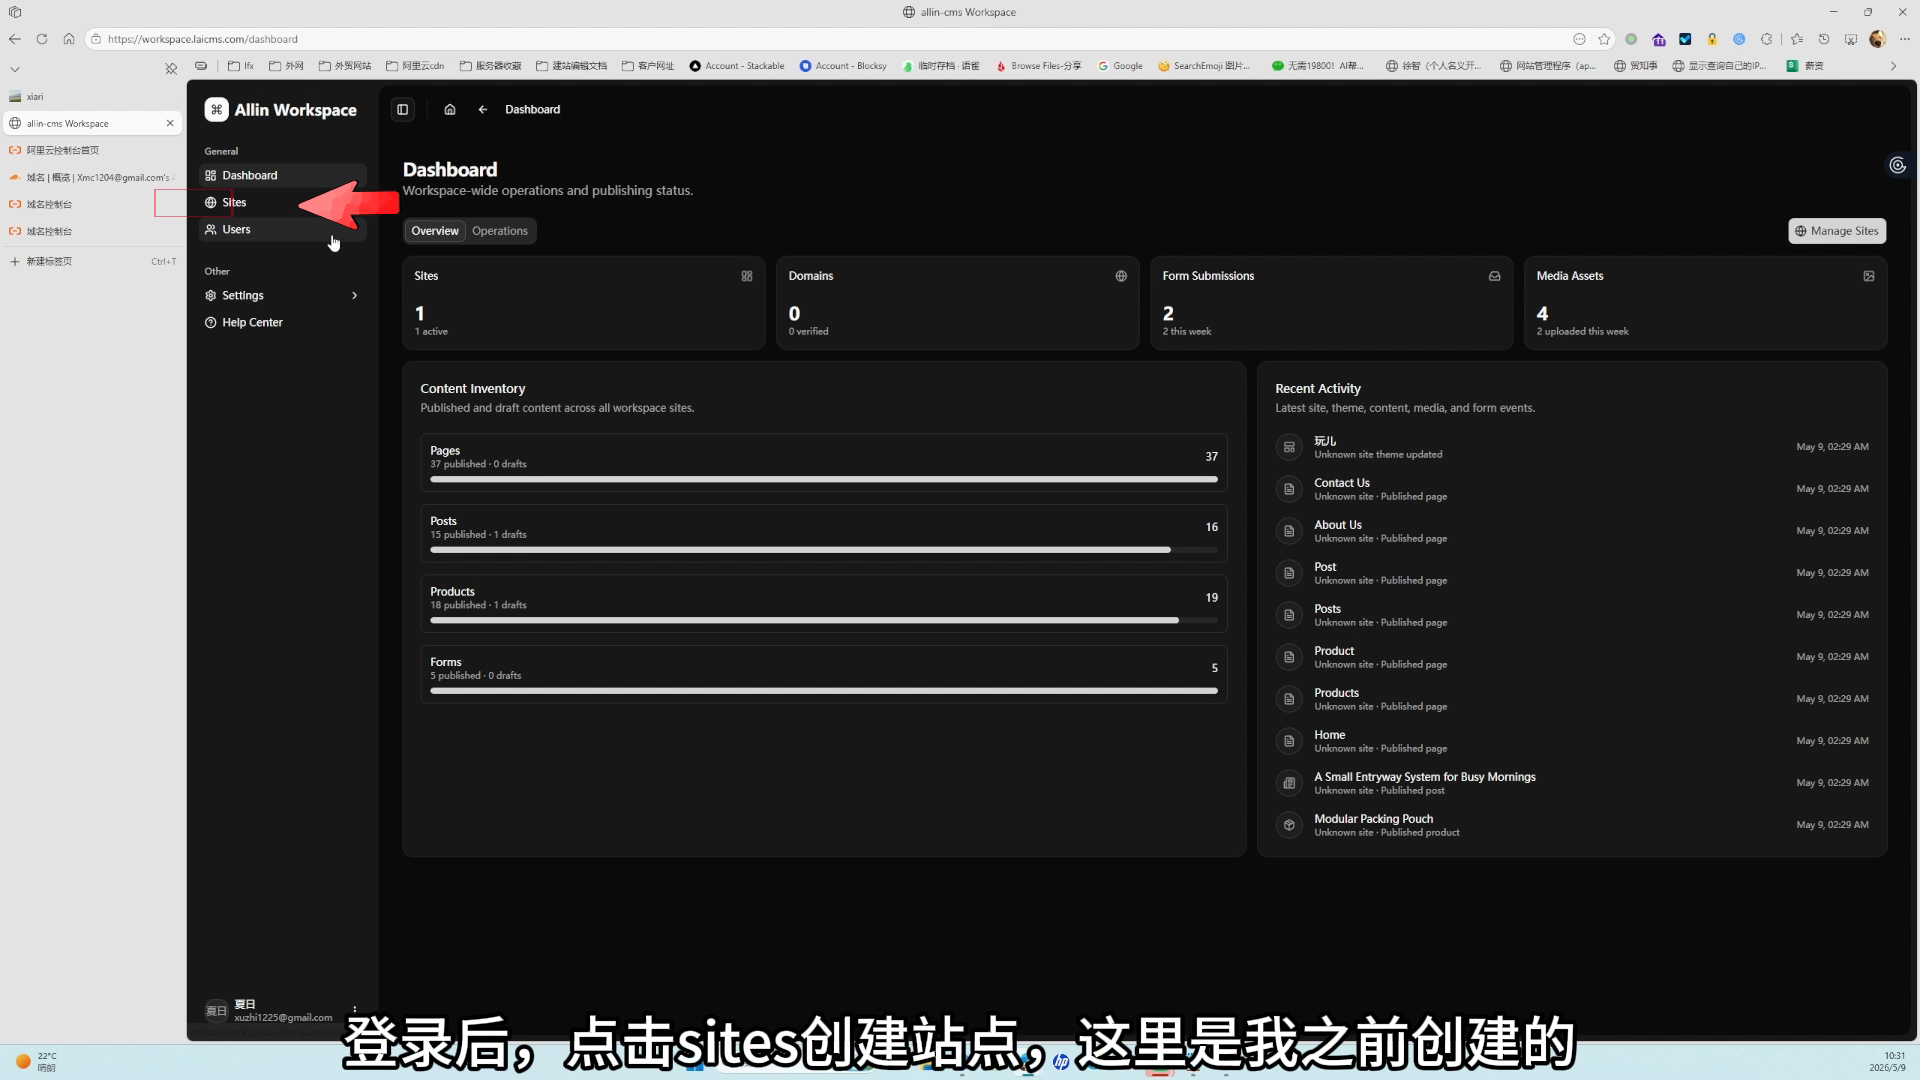
① Open Dashboard
Log in to the AllinCMS admin workspace, open Sites, find the site you want to connect, and enter its dashboard.
In the dashboard, open Settings -> Domains from the left sidebar.
This page is used to:
- Copy the AllinCMS admin
CNAME target. - Add the domain you want to connect.
- Check whether
DNSandSSLhave passed.
② Copy Target
At the top of the Domains page, find the CNAME target. It usually looks like this:
8j9u3j5h1a.web.allincms.com
Click the copy button to the right of the CNAME target.
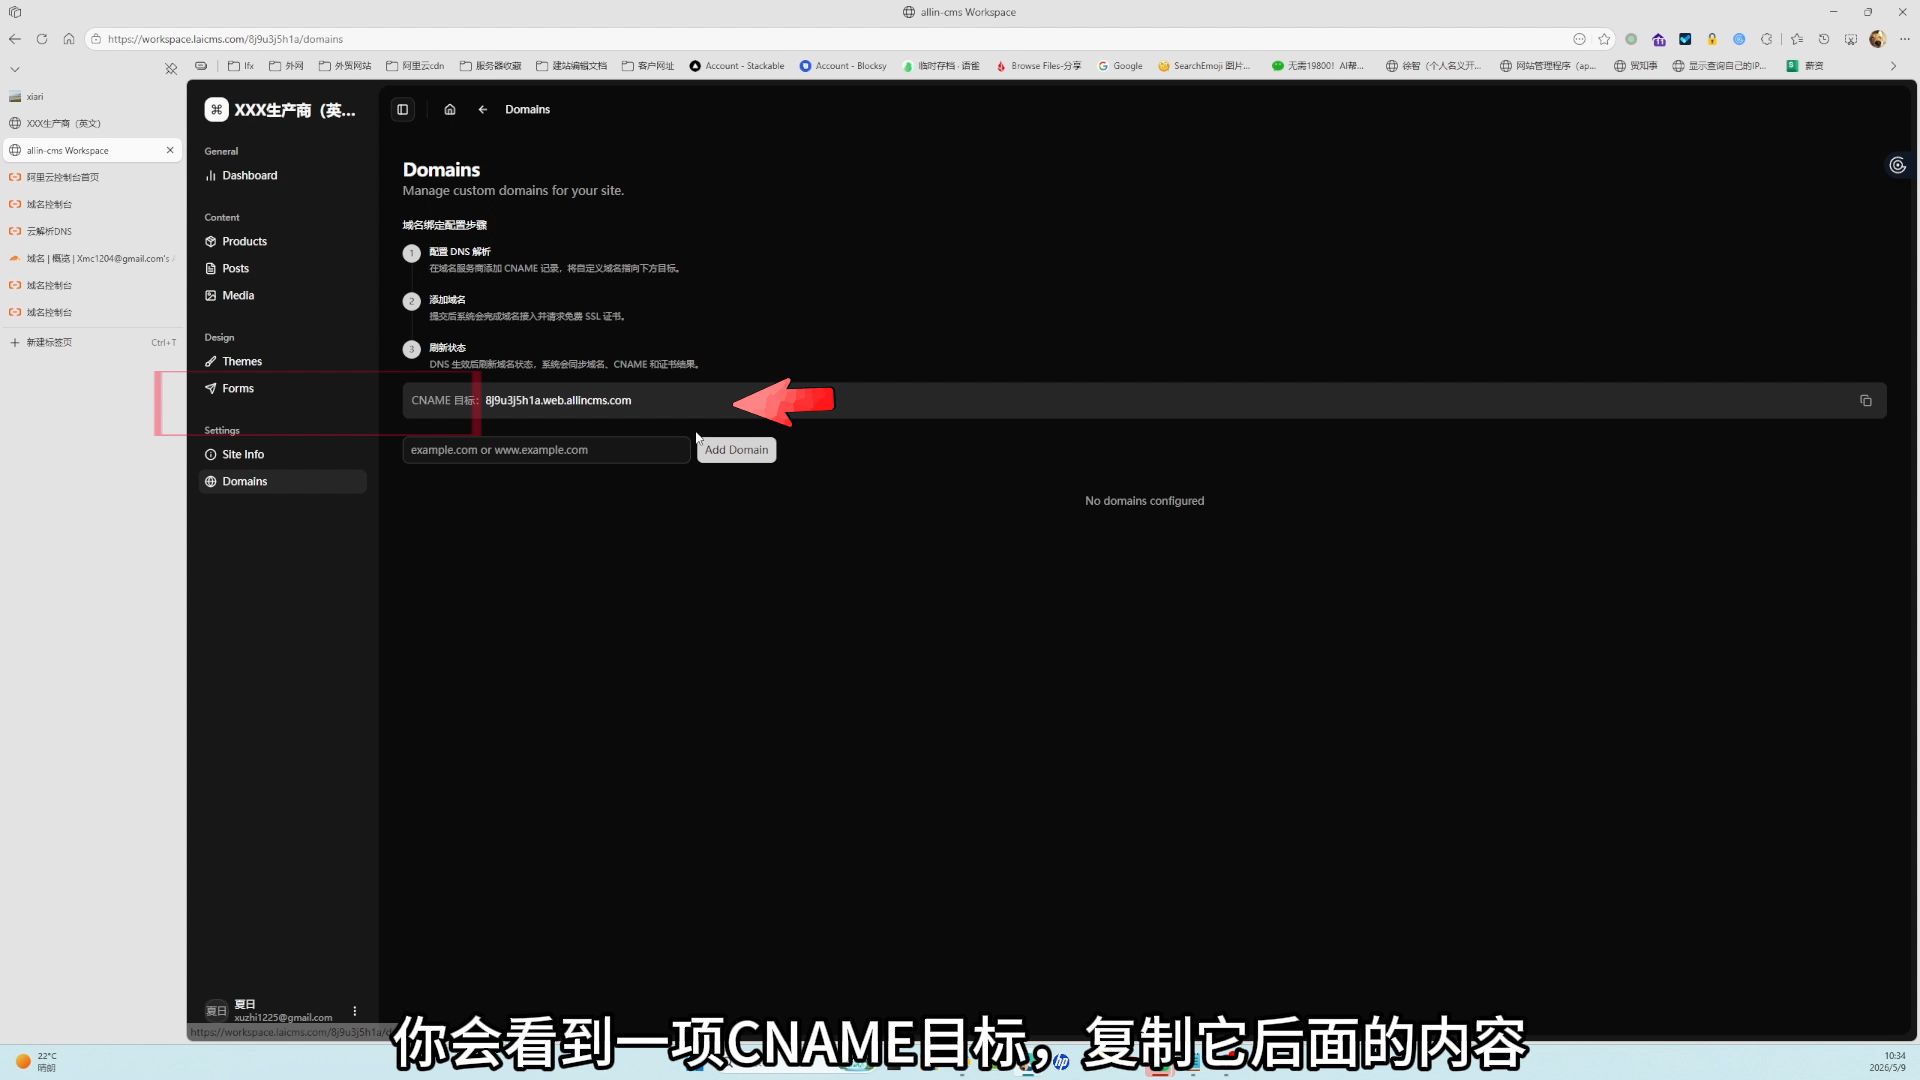
Copy the plain domain, such as 8j9u3j5h1a.web.allincms.com. Do not enter https://8j9u3j5h1a.web.allincms.com.
Now you know where the domain should point. Next, go to your DNS provider.
2. Add DNS
Your DNS provider is where the domain is purchased or currently managed, such as Alibaba Cloud, Tencent Cloud, Cloudflare, West.cn, or Name.com.
If you are not sure where the domain was purchased, find the registrar account first. DNS must be changed in the platform that currently manages the domain.
① Confirm Both Domain Versions
To make both the root domain and www domain open the site, Alibaba Cloud needs both versions below:
| User visits | Host | Example |
|---|---|---|
| Root domain | @ | example.com |
| www domain | www | www.example.com |
② Add Two CNAME Records
Using Alibaba Cloud as an example, open the domain's DNS page and click Add Record twice. Save these two records separately:
| Host | Type | Value / Target |
|---|---|---|
@ | CNAME | Paste the AllinCMS admin CNAME target |
www | CNAME | Paste the same CNAME target |
Leave TTL at the default value for both records.
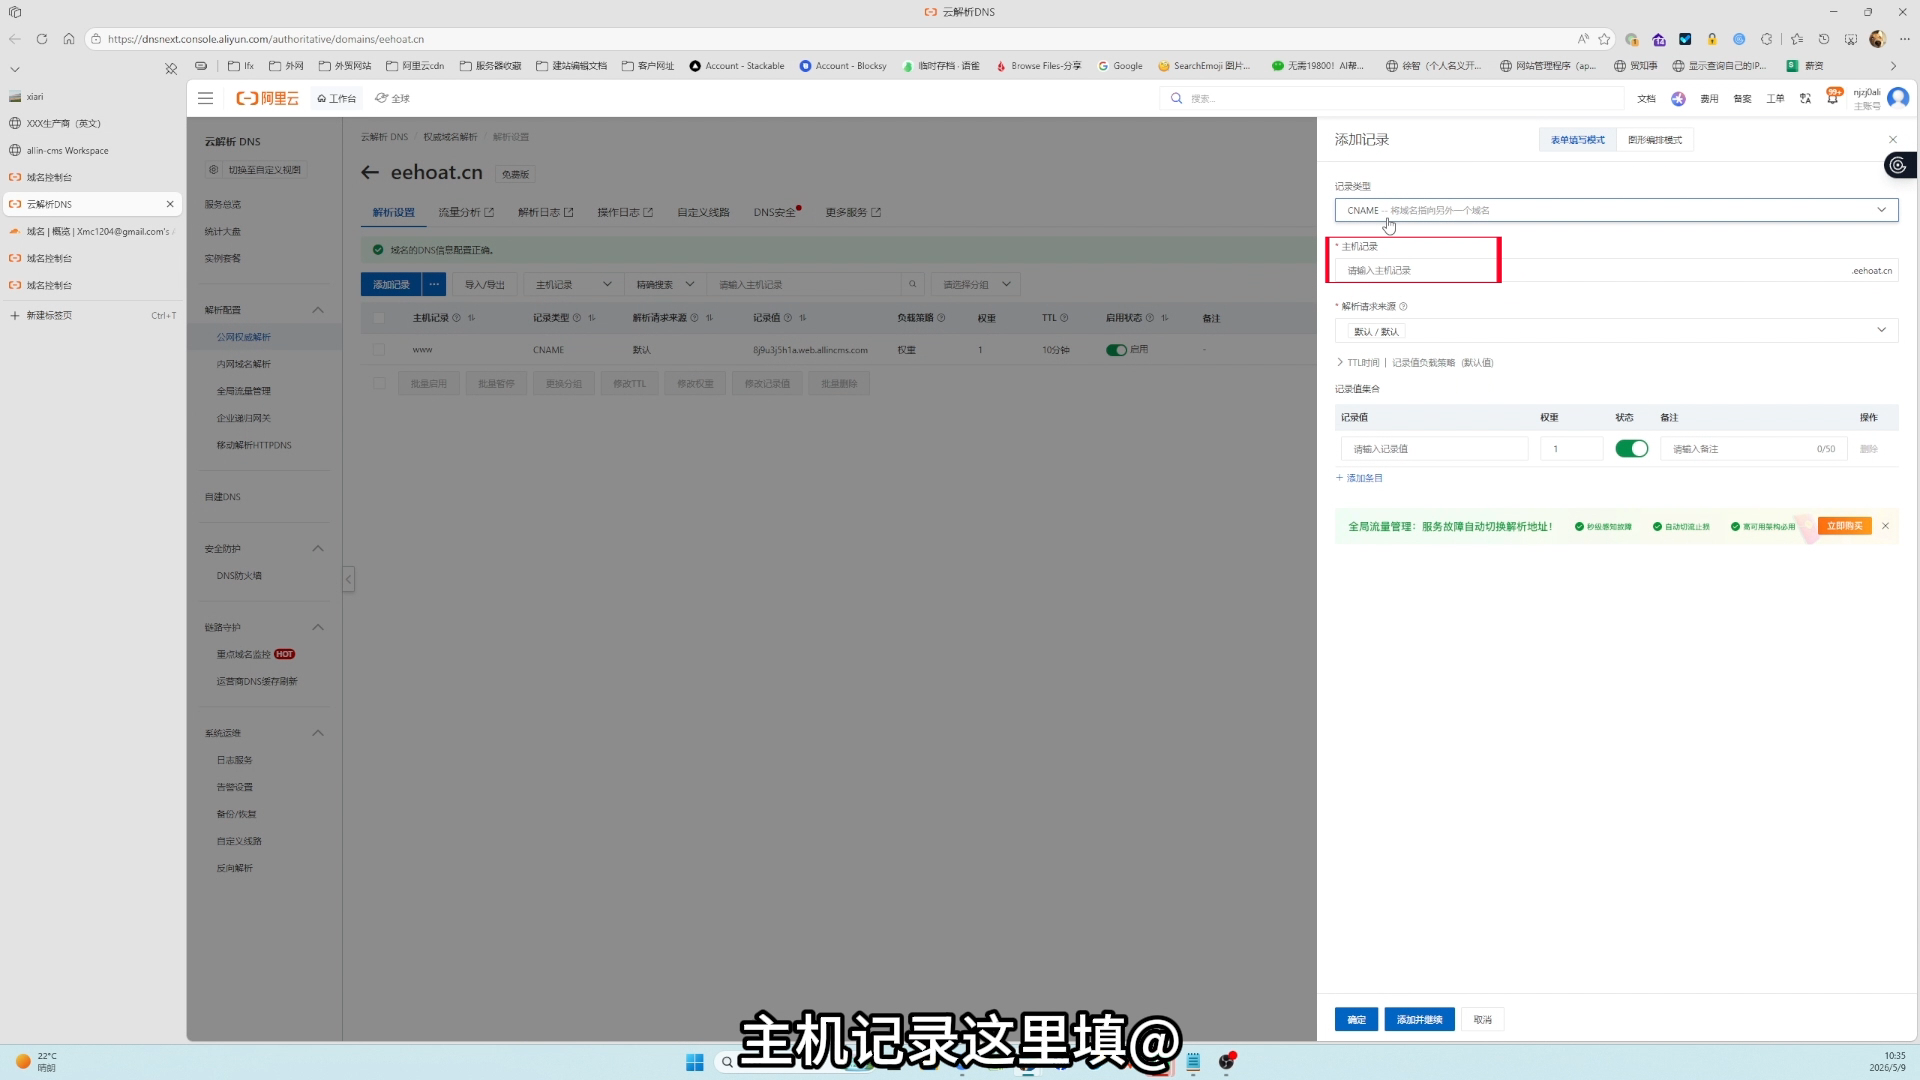
Alibaba Cloud requires both records here. Do not add only one. Add and save @ first, then click Add Record again and save www.
After saving, check:
- Both
@andwwwappear in the DNS record list. Record typeisCNAME, notA.- Both records use the same AllinCMS admin
CNAME target. - The value has no
https://prefix and no path suffix.
If your domain uses Cloudflare, finish the main flow in this guide first. Proxy and root-domain redirect details are in 📚 Cloudflare DNS.
Alibaba Cloud now points both the root and www domains to the AllinCMS site. Next, add both domains in AllinCMS admin.
3. Refresh
After saving both DNS records, return to AllinCMS admin and add the root and www domains separately. Otherwise AllinCMS admin does not know which site should use them.

① Add Domain
Return to the AllinCMS admin Domains page and add both domains below.
First add the www domain:
www.example.com
Then add the root domain:
example.com
② Wait
Check the status badges on the right side of the domain row:
| Status | Meaning | What you need |
|---|---|---|
Alias | The domain was added to AllinCMS admin | Added |
DNS | DNS points to the CNAME target provided by AllinCMS admin | Passed |
SSL | HTTPS certificate was issued | Passed |
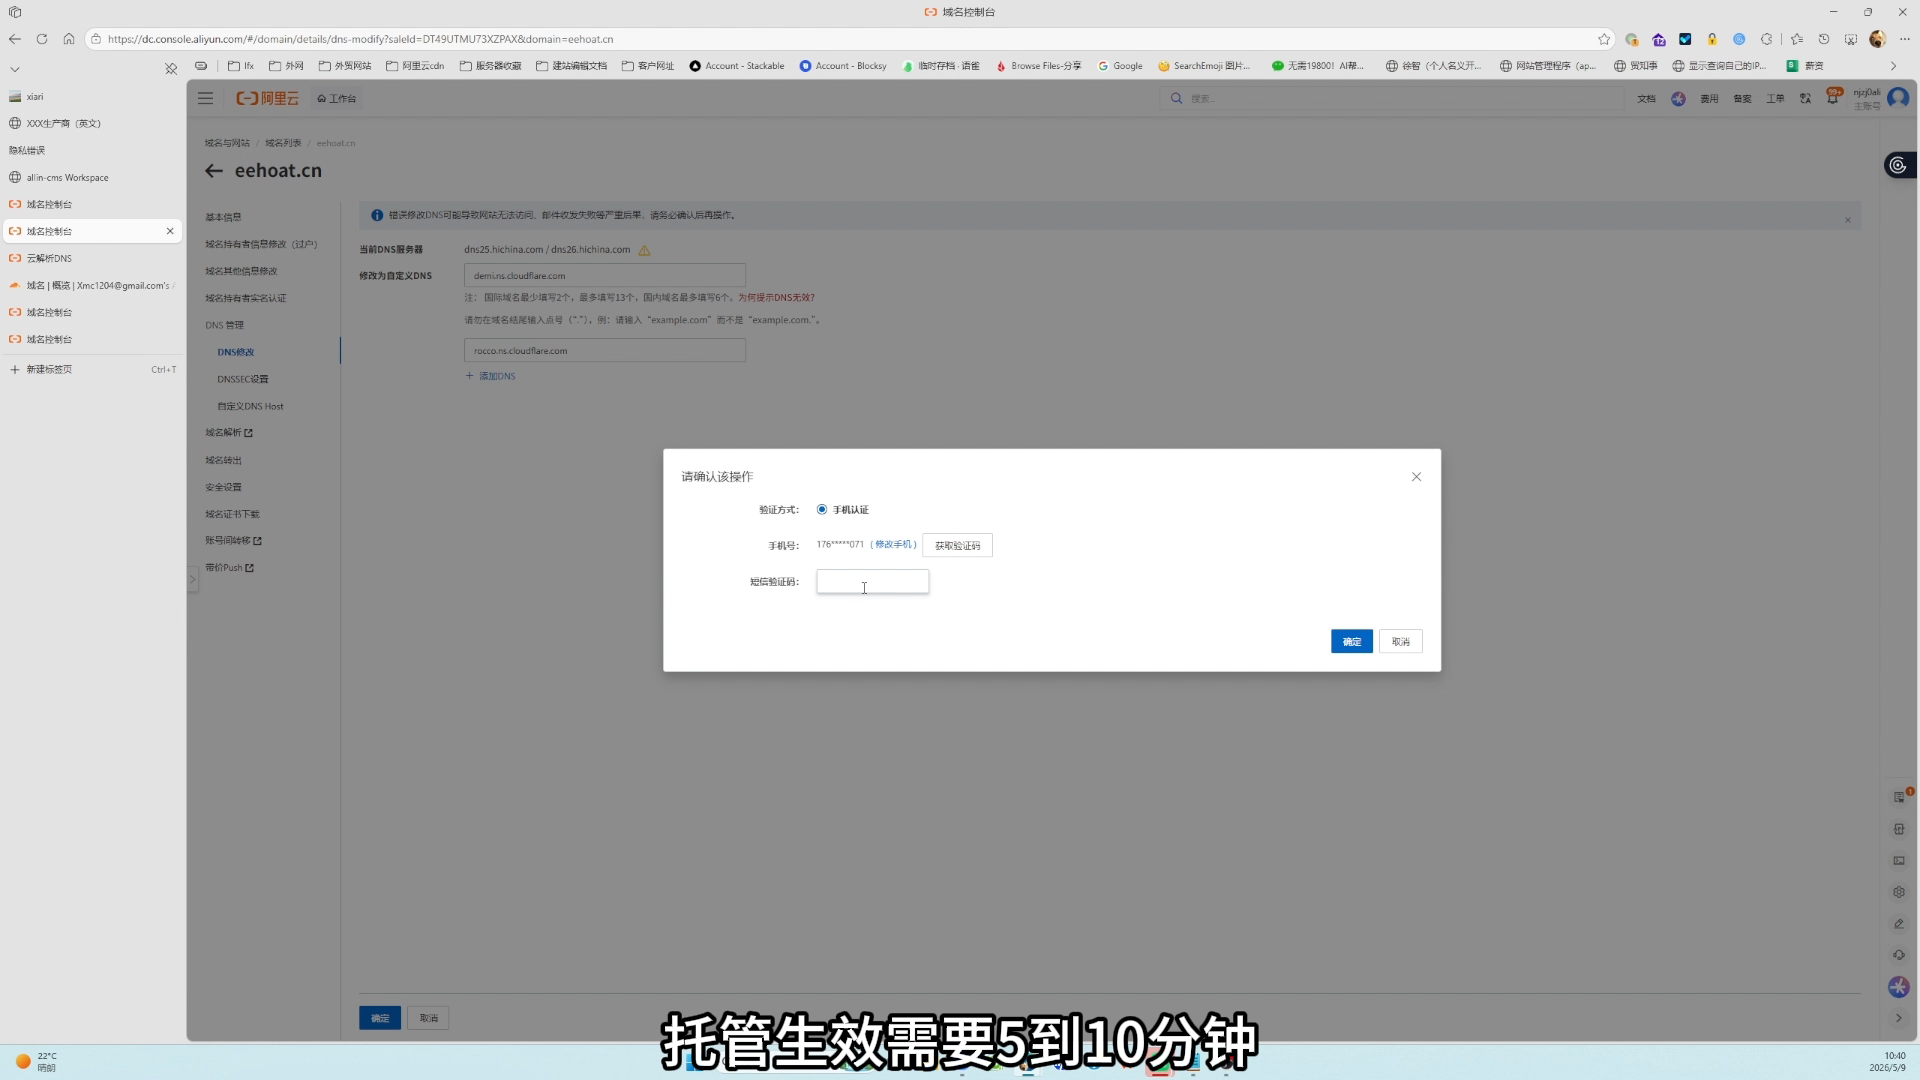
DNS does not update everywhere instantly. Wait 5 to 10 minutes, then click the refresh button on both domain rows. In some cases it may take around 30 minutes.
DNS and SSL may not pass at the same time. After DNS passes, SSL may still need a little more time. If DNS is already correct, do not keep deleting and recreating records.
At this point, the main setup is done. AllinCMS admin is checking the domain and issuing the HTTPS certificate.
4. Test
When the statuses pass, open:
https://www.example.com
If the site opens normally, the domain is connected.
After adding DNS and returning to AllinCMS admin, wait about 10 minutes. Refresh the DNS and SSL statuses, then open the site. If both statuses pass and the site opens normally, the domain is connected. You do not need to read the troubleshooting or special cases below.
If it does not open, check in this order:
- The domain you visit is the same domain you added in AllinCMS admin.
- The browser address starts with
https://. - The DNS
HostandValuewere not swapped. DNSandSSLboth pass in AllinCMS admin.
💡 Site opens but the browser says it is not secure? Read SSL Certificate Not Active.
Special Cases
Nameservers
Some platforms do not ask you to add DNS records directly. They first ask you to change nameservers. This is common when delegating DNS to Cloudflare, West.cn, Name.com, or another DNS platform.
Finish DNS delegation first, then add the CNAME record.
The order is:
- Copy the two
NSnameserver values from the new DNS platform. - Go back to the original domain registrar.
- Find
DNS server,Nameserver, orChange DNS. - Replace the old nameservers with the two new values.
- After delegation takes effect, add the CNAME record in the new DNS platform.
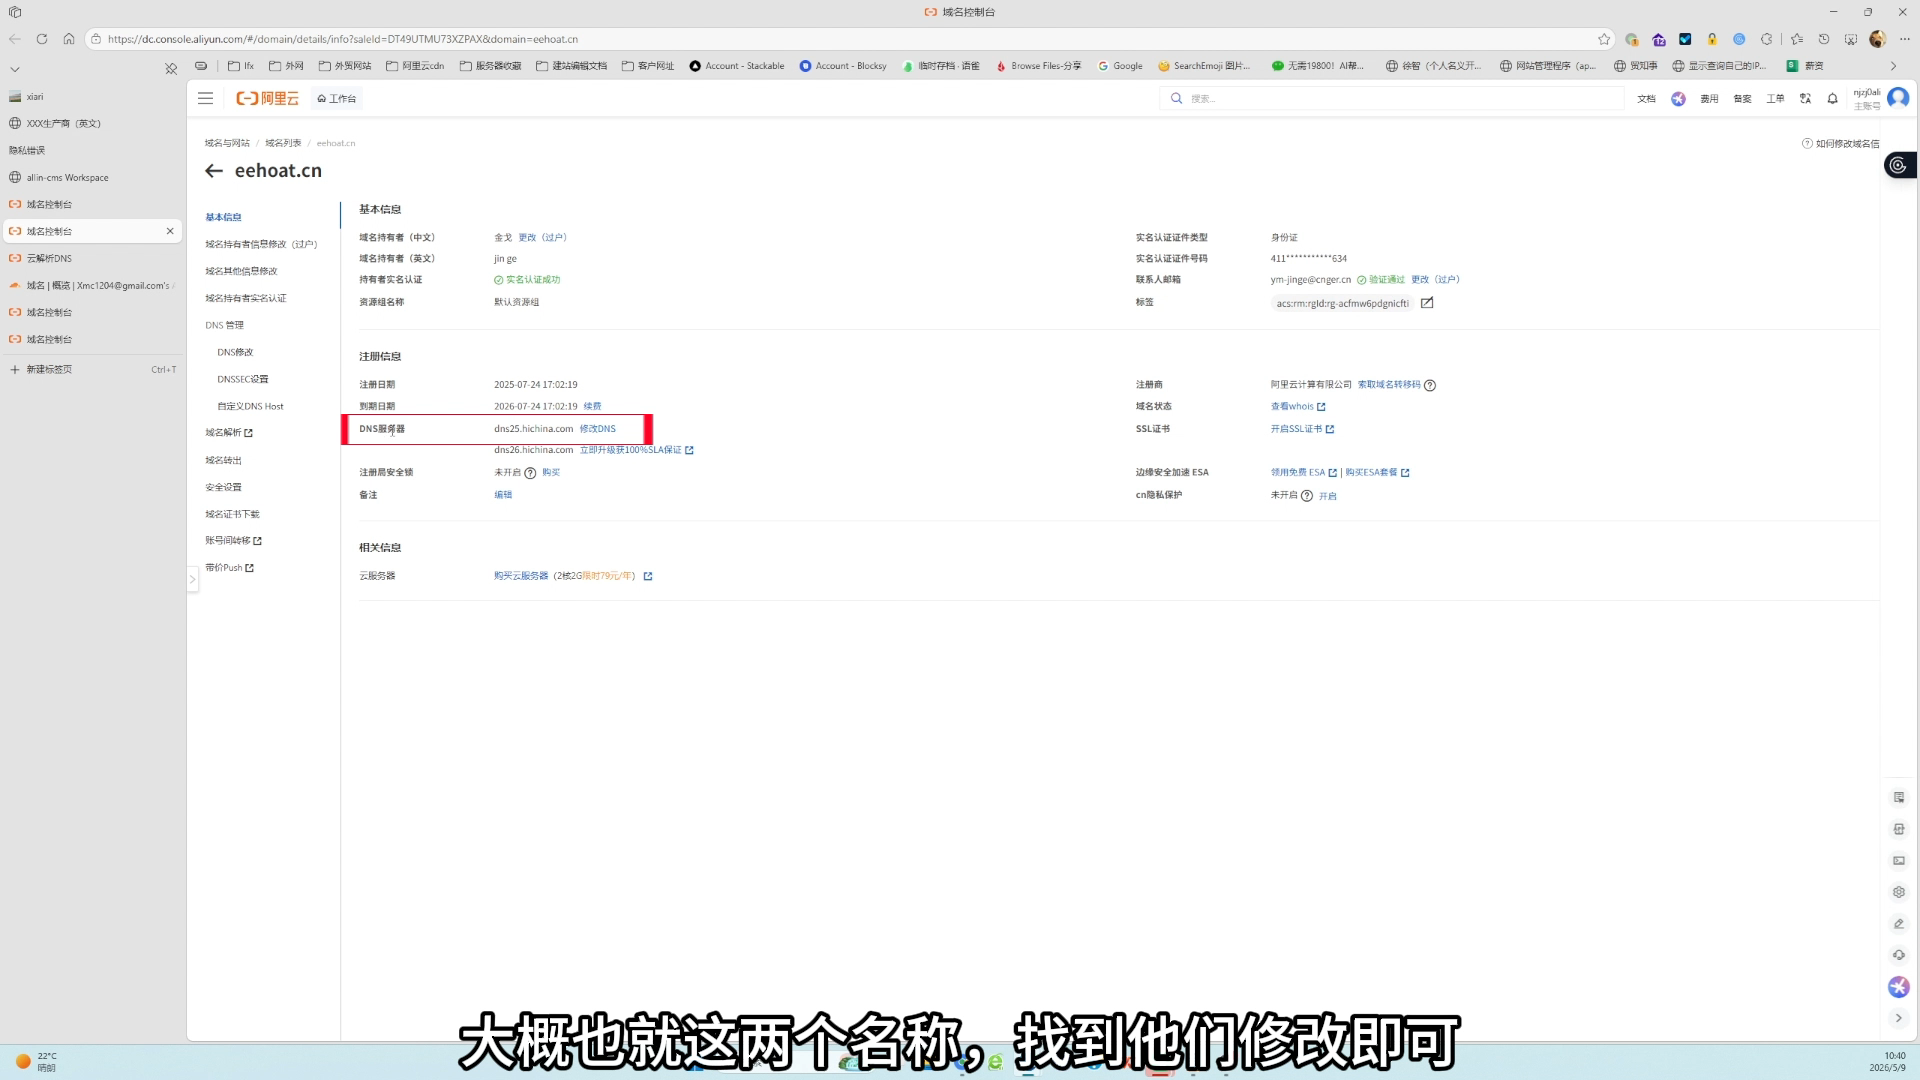
After changing nameservers, records in the old DNS platform usually stop controlling the domain. Manage future DNS records in the new platform.
Cloudflare
In Cloudflare, add the CNAME record with proxy disabled first. The cloud icon should be gray and show DNS only.
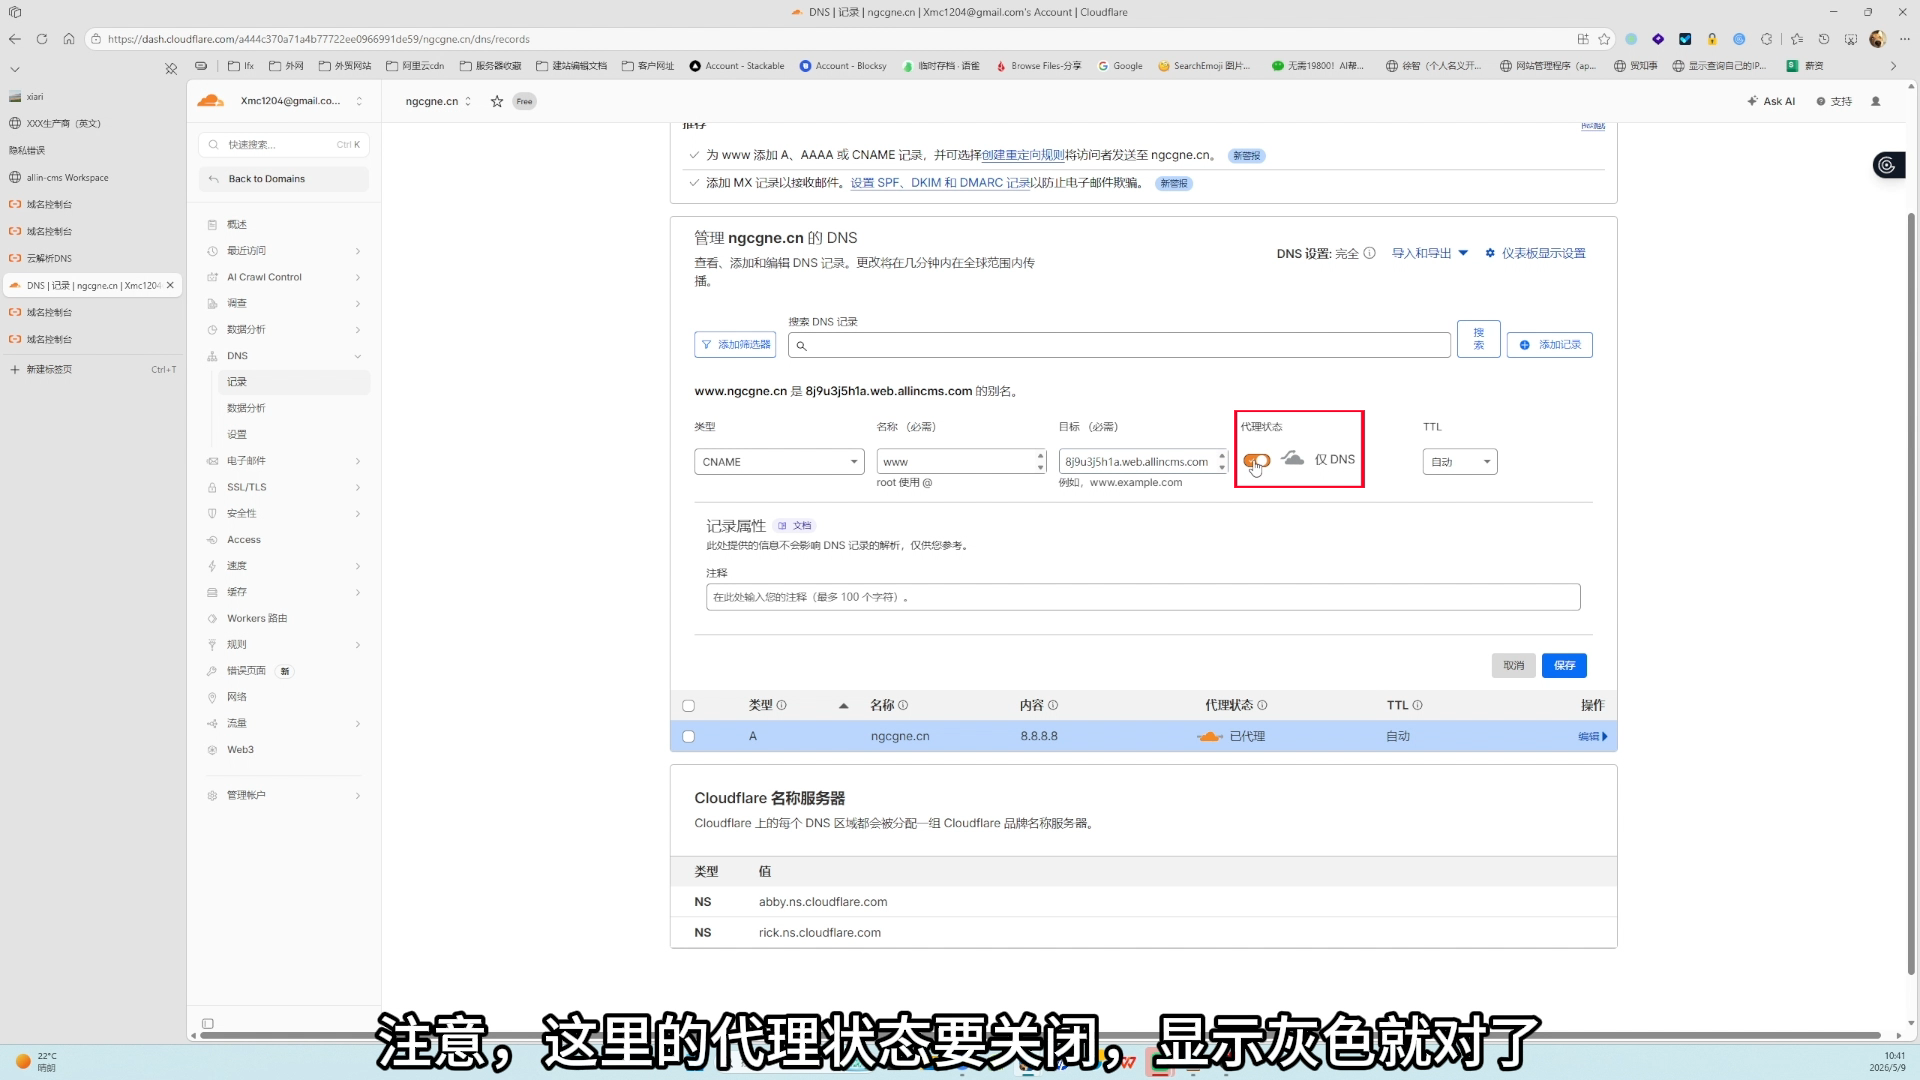
Remember:
- To let AllinCMS admin verify
DNSandSSL, useDNS onlyfirst. - To redirect the root domain to
www, read 📚 Cloudflare DNS. - If access fails after enabling proxy, disable proxy and refresh in AllinCMS admin.
Pitfalls
| Mistake | Result | How to avoid it |
|---|---|---|
🔴 Adding https:// before the CNAME target | DNS never passes | Enter the plain domain only |
🔴 Choosing record type A | The domain does not point to the CNAME target provided by AllinCMS admin | Choose CNAME |
🔴 Adding only @ or only www in Alibaba Cloud | The other domain version does not open | Add both @ and www CNAME records |
🟡 Mixing up @ and www | The address users visit does not open | @ is root, www is the www domain |
| 🟡 Reconfiguring before SSL passes | You waste time and may break DNS | Wait after DNS passes |
| 🔴 Deleting old DNS records casually | Email or verification may break | Do not delete MX or TXT blindly |
Completed
- ✅ You copied the AllinCMS admin
CNAME target. - ✅ You added both
@andwwwCNAME records at the DNS provider. - ✅ You added the domain in AllinCMS admin.
- ✅ You know how to check
DNSandSSL. - ✅ You know how to handle Cloudflare and nameserver cases.
Next
- 📚 Cloudflare DNS: read this if your domain uses Cloudflare.
- 📚 SSL Certificate Not Active: read this if the browser says the site is not secure.
- 📌 Migrate an Old Site: read this when moving an existing website to a new AllinCMS site.