Google Analytics 4 (GA4) Setup
This guide helps you add Google Analytics 4 to an AllinCMS site: create or find a GA4 web data stream, copy the G- measurement ID, and paste it into AllinCMS admin.
GA4 is Google's website analytics tool. After setup, you can see whether visitors are opening the site, where they come from, and which pages they view.
AllinCMS admin only needs the G- measurement ID, such as G-XXXXXXXXXX. Do not paste the full code block or any <script> tag.
Before You Start
Prepare these items first:
| What you need | Why you need it |
|---|---|
| Google account | To sign in to Google Analytics |
| Website domain | To create a web data stream, such as www.example.com |
| AllinCMS admin access | To add the GA4 measurement ID to the website |
Sign in to Google Analytics first. Google Analytics setup pages are visible only after signing in with a Google account. If Google asks you to log in, sign in first, then come back and continue.
Overview
1. Open Google Analytics
Open Google Analytics.
If this is your first time using GA4, click Start measuring. If your company already has GA4, enter the existing account instead.
If you have used GA4 before, you can also open Admin from the bottom-left corner, then create a new account or property from there.
Do not create another property if your team already has GA4. Open Admin -> Data streams and find the stream for this website.
2. Create an Account and Property
If you do not have GA4 yet, create an account and a property first.
- Click
Start measuringin Google Analytics. - Enter an
Account name; use the company name or a name you can recognize later. - Keep the account data sharing settings as default, then click
Next.
- Enter the
Property name; use the website name or domain, such aswww.example.com. - Choose the reporting time zone, such as your local business time zone.
- Choose currency; many export websites use
USD, but you can choose based on your business.
- Follow the page prompts to choose industry and business size, then click
Create.
- When the terms dialog appears, choose your region, check the agreement boxes, and click
I accept.
If you only see one agreement checkbox, scroll down inside the dialog. The second checkbox sometimes appears lower in the dialog.
3. Create a Web Data Stream
After creating the property, Google Analytics asks how you want to collect data. Choose Web.
For website analytics, choose Web. Do not choose iOS or Android.
When filling the web data stream, focus on these fields:
| Field | How to fill it |
|---|---|
| Website URL | Keep https:// in the selector and enter only the domain |
| Domain format | Use www.example.com; do not add another https:// or a trailing / |
| Stream name | Keep the default or use the website name |
| Enhanced measurement | Keep it enabled |
After filling the fields, click Create & continue.
4. Open Data Stream Details
If you already have GA4, or you just created the web data stream, you can find it again from Admin.
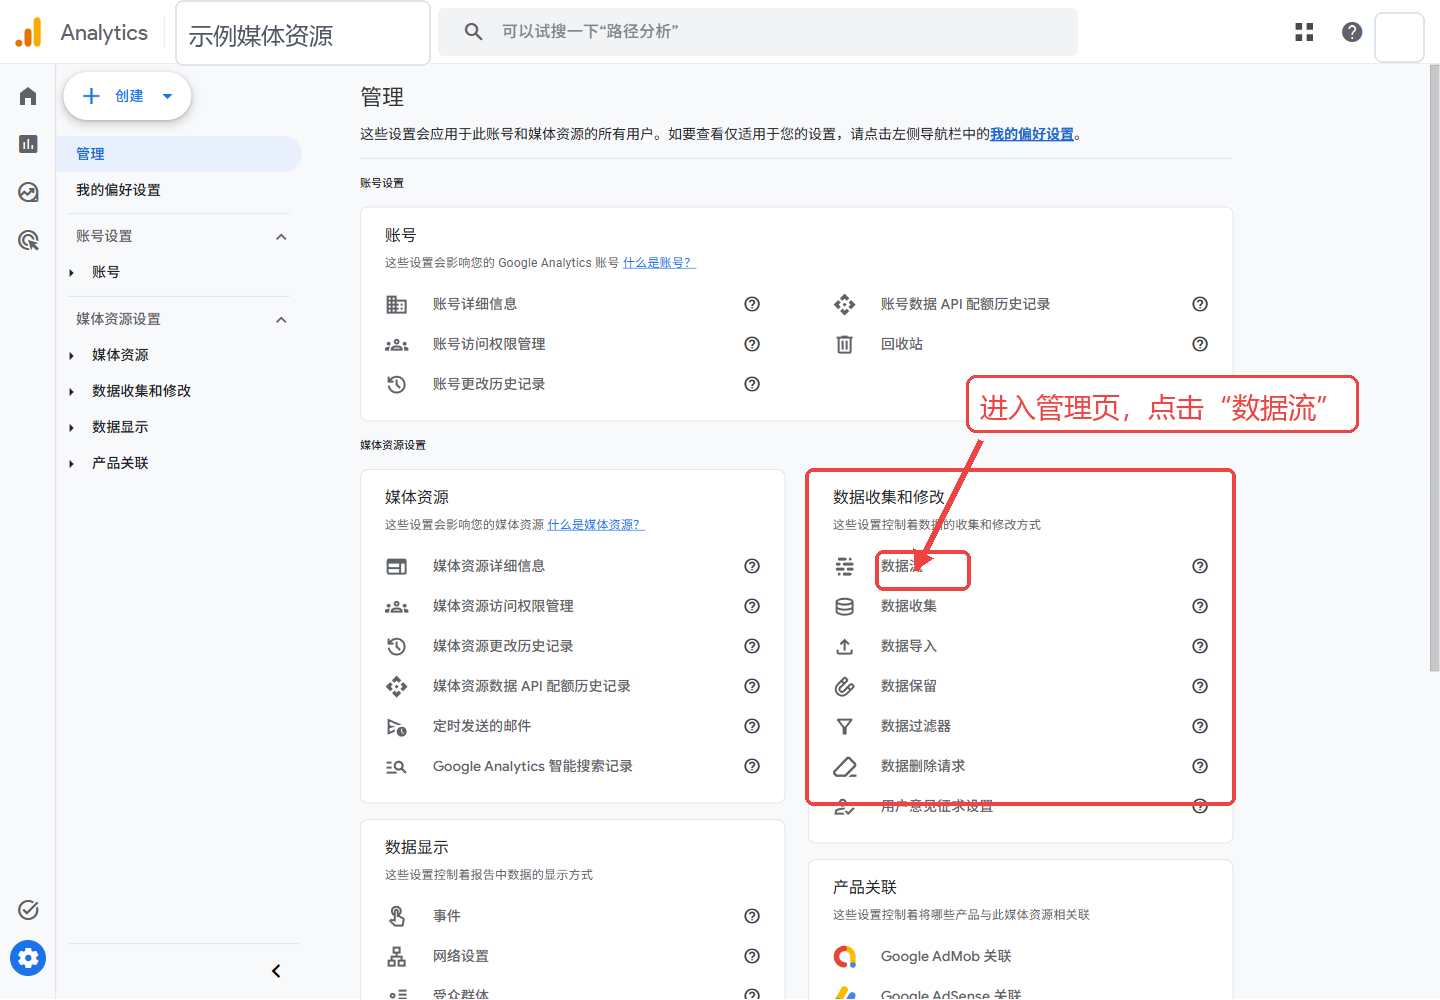
Open Admin in the bottom-left corner. Under Data collection and modification, click Data streams.
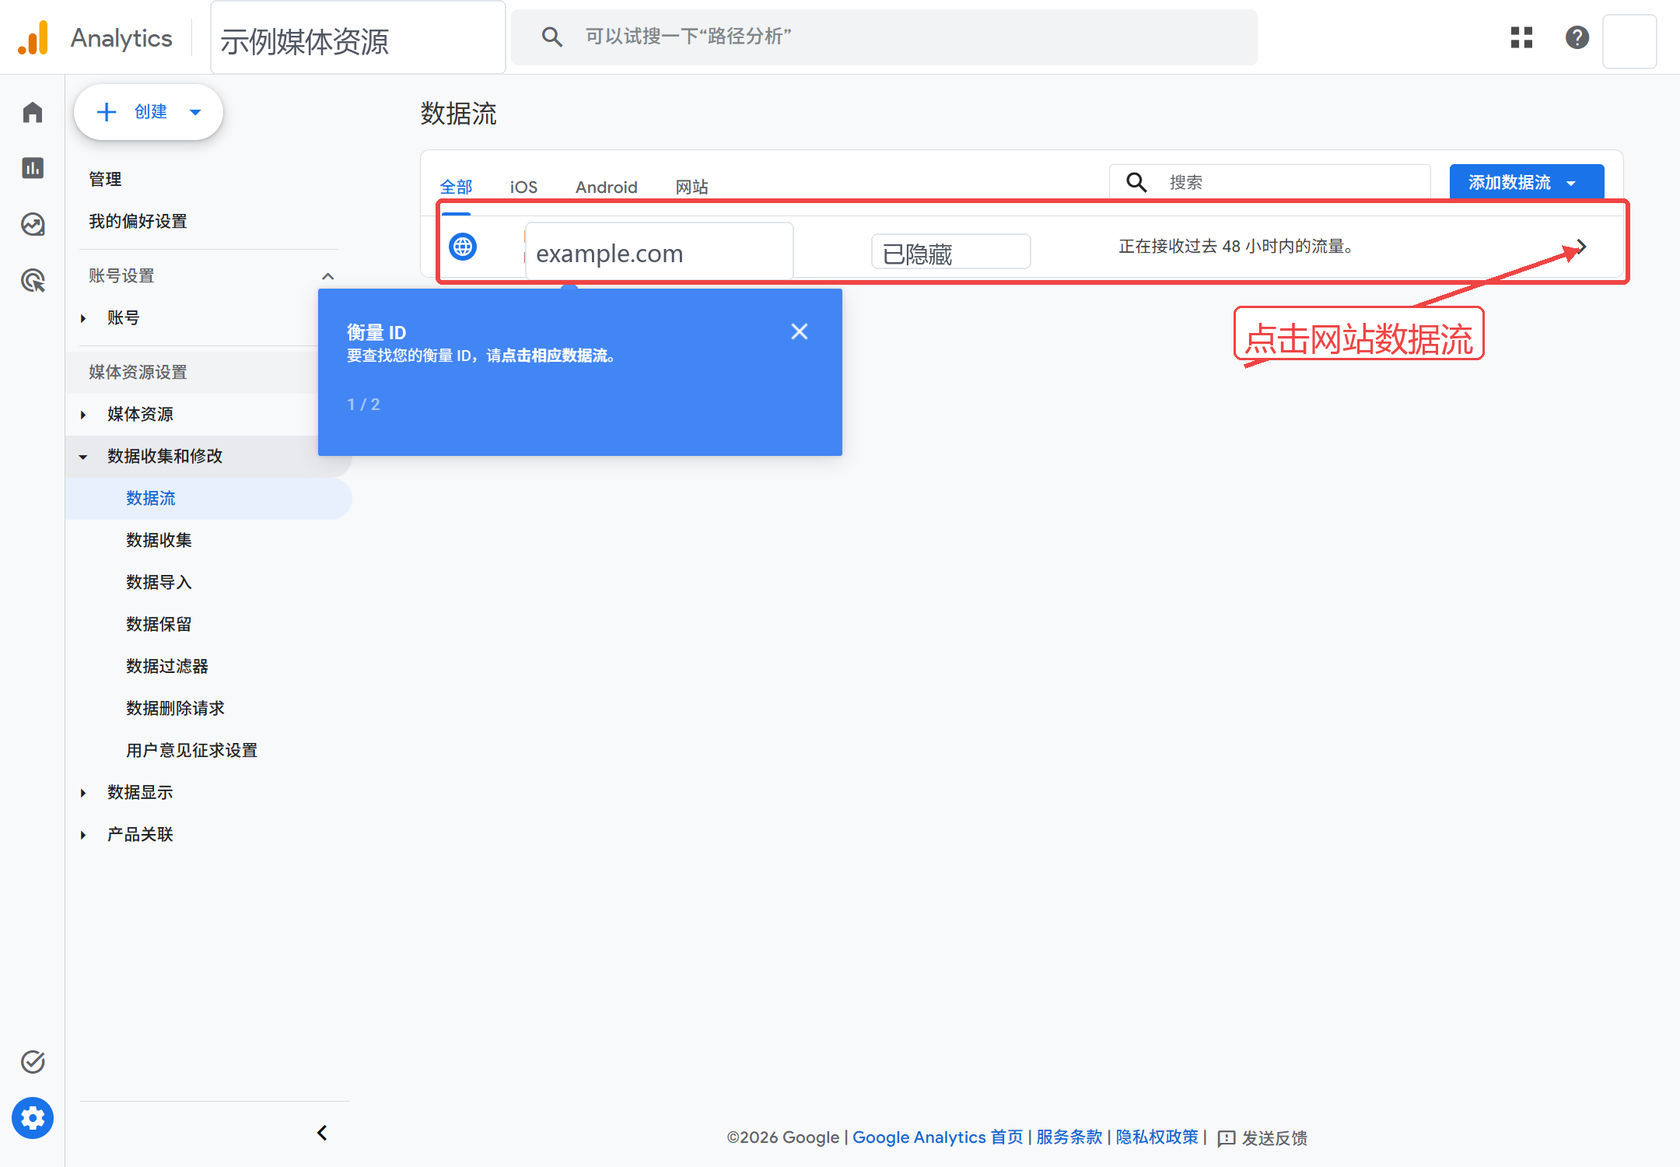
Inside Data streams, switch to Web, then click the data stream row for this website.
5. Copy the G- Measurement ID
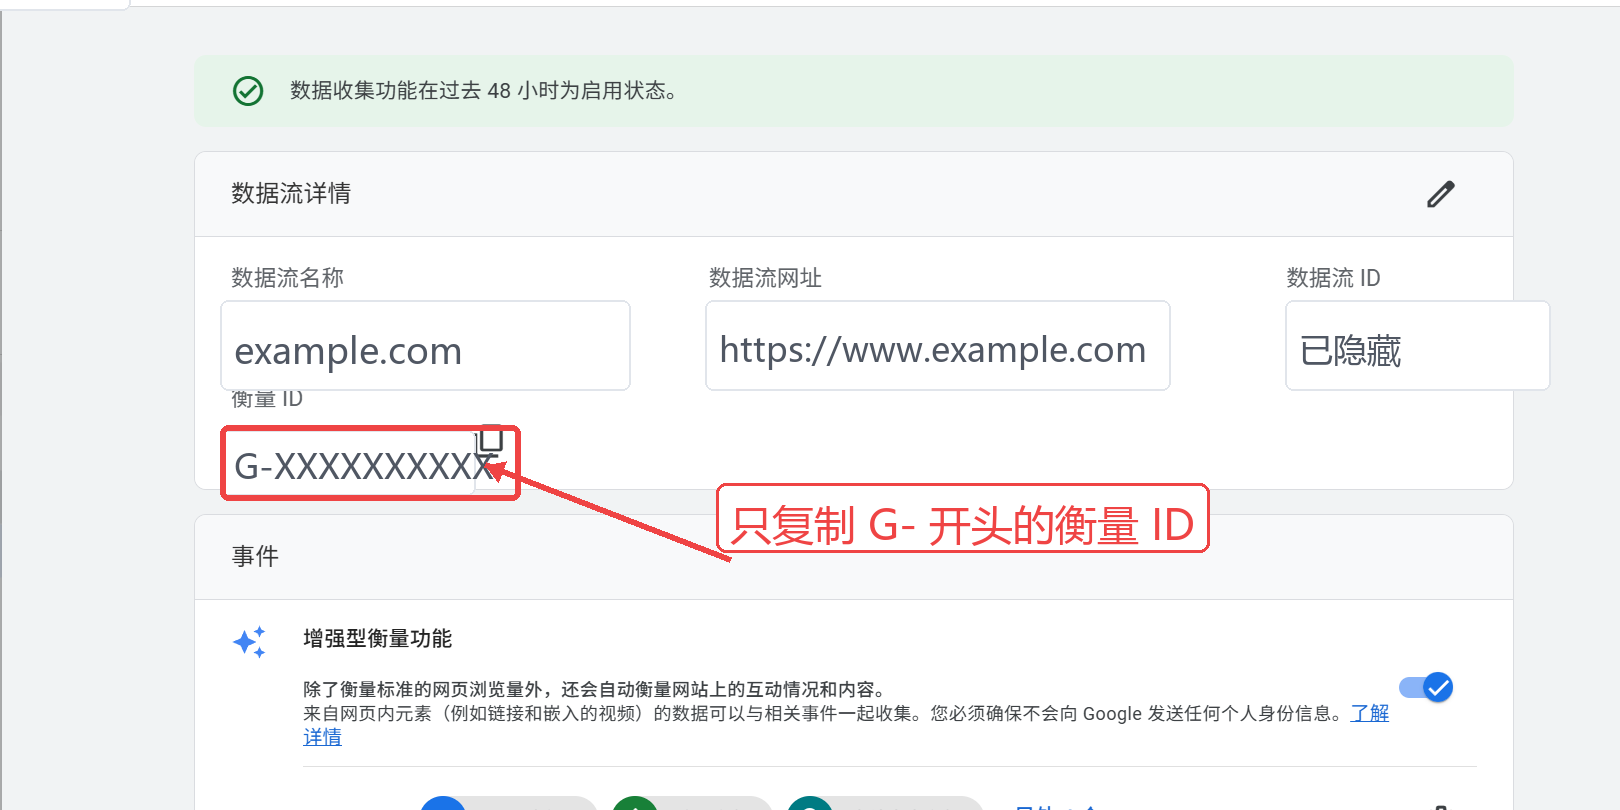
In the web stream details page, find Measurement ID.
It usually looks like this:
G-XXXXXXXXXX
Only copy the G- ID. Do not copy the full Google installation code, and do not copy any <script> tag.
If GA4 opens Installation instructions after creating the stream, do not copy the gtag.js code. Return to the stream details and copy Measurement ID instead.
6. Add Google Tag ID in AllinCMS Admin
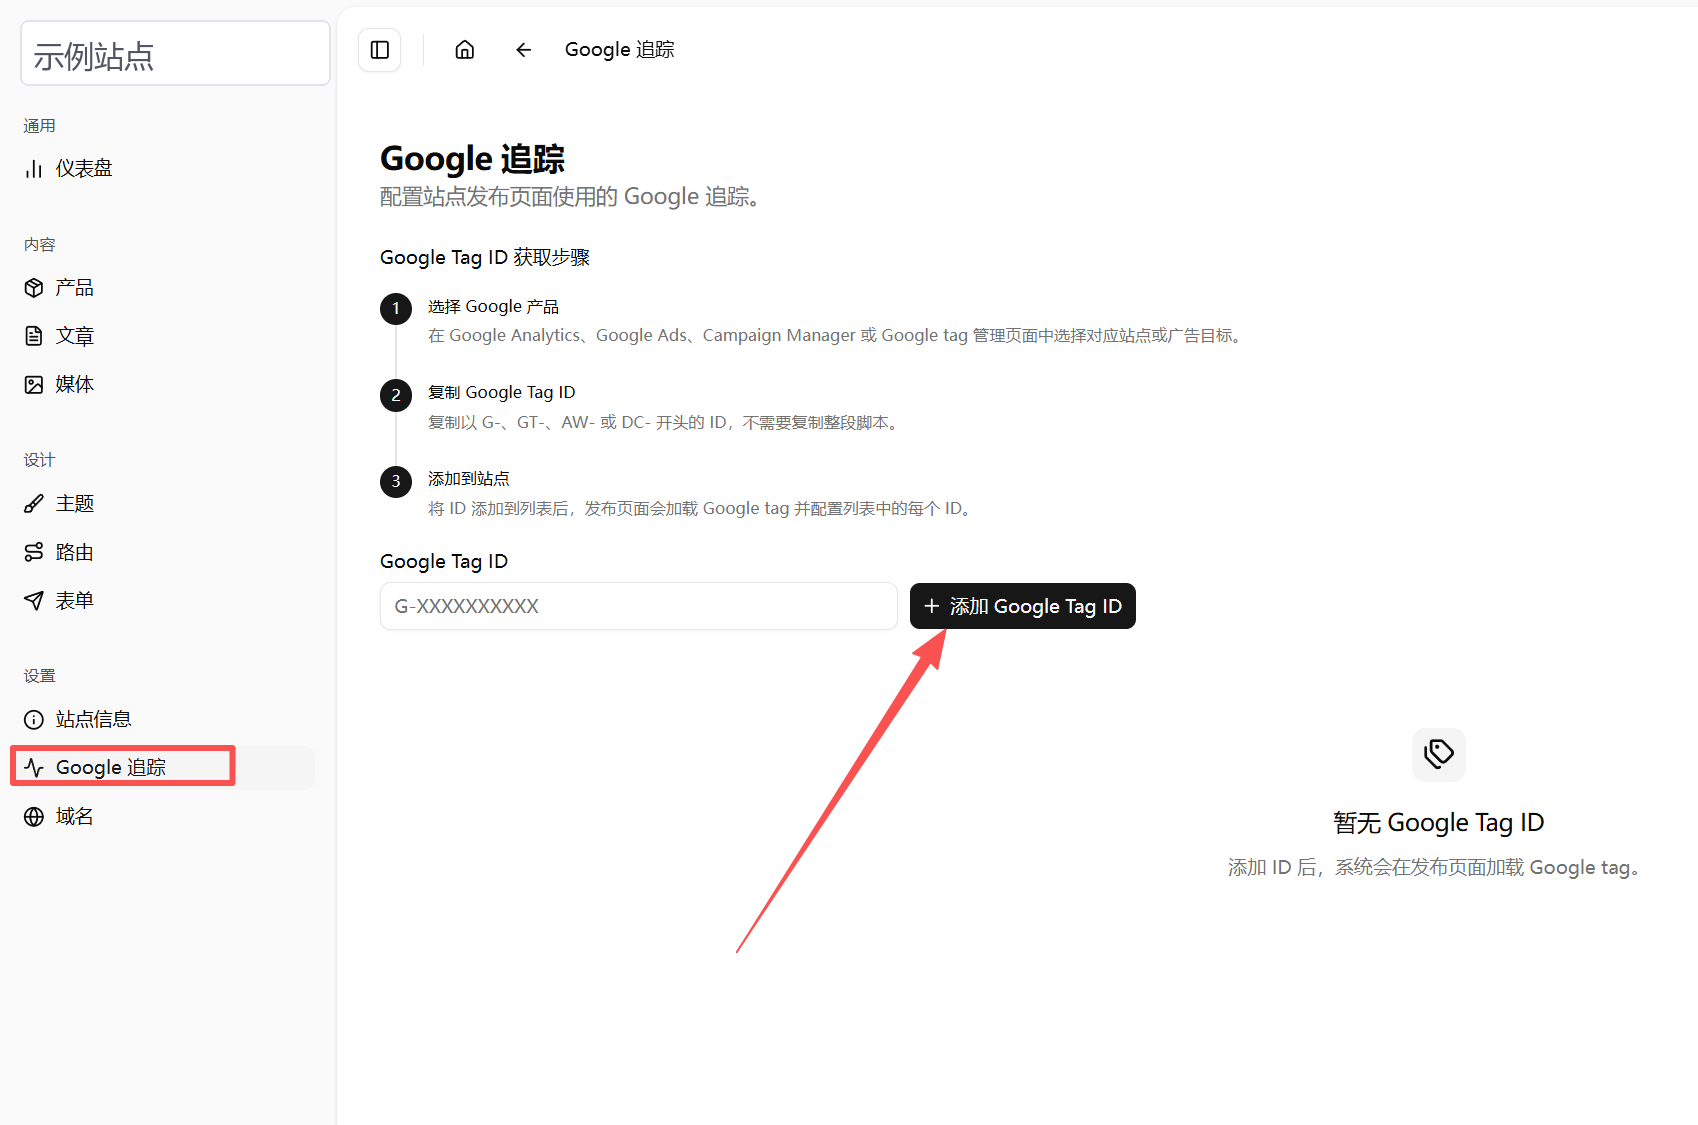
Open AllinCMS admin for your site, then click Google Tracking in the left sidebar.
Paste the G-XXXXXXXXXX value into Google Tag ID, then click Add Google Tag ID.
7. Check Realtime Reports
After adding the Google Tag ID, open your frontend site in another browser, an incognito window, or a phone, and visit one or two pages.
If GA4 still shows the installation instructions page, you can click Test installation in the top-right corner. This is only an auxiliary check. The final check should still be whether traffic appears in Realtime reports.
Then return to Google Analytics and open Reports -> Realtime overview. Check Users in last 30 minutes.
When the realtime user count shows 1 or more, the website has started sending visit data to GA4.
Realtime reports are usually quick, but not always instant. Wait 1 to 5 minutes, then refresh.
Common Issues
| Issue | Cause | Fix |
|---|---|---|
| No data in GA4 | The ID was just added, or no frontend page has been visited yet | Open one or two frontend pages, then wait 1 to 5 minutes |
| The ID does not work | Full script or wrong ID was pasted | Paste only the G- ID |
The ID starts with UA- | This is the old Universal Analytics format | Create or find a GA4 G- measurement ID |
| Website URL cannot be saved | https:// was entered twice, or the domain ends with / | Keep the https:// selector and enter only the domain |
| Your own visit does not show | Browser extensions, network delay, or cache | Try another browser, incognito window, or phone |
| Company network visits do not show | GA4 may filter office IP traffic | Test with mobile data or check GA4 filters |
| The site has multiple domains | The same site may be reachable from multiple domains | Test with the official primary domain first |
Pitfalls
- Do not paste
<script>code; paste only theG-ID. - Do not use the old
UA-ID. GA4 measurement IDs start withG-. - When creating the data stream, enter only the domain in the URL input.
- After adding the ID, open the real frontend site for testing.
- Standard GA4 reports can be delayed. Check
Realtime overviewfirst.
Next
Launch Checklist - after GA4 is added, run the full launch check before going live.